This page is part of a series of tutorials and FAQs for Lulu authors on preparing books and their covers for printing by Lulu.com. See http://yaquinapress.com for links.
The good news is that there is a site on the Internet that you can input your ISBN to and then download a file containing an EAN barcode. The bad news is that getting this barcode onto your book properly is not as simple as it might at first seem. The right tools help, but there are some issues to keep in mind so this tutorial goes through some steps on some detail.
Here are the issues that this tutorial aims to help you resolve:
- What size should the barcode be?
- How do you get the OCRB font on your barcode?
- Are other fonts acceptable?
- How do you import the .eps file into an image processing program without blurring it?
- How do you save your barcode without blurring it?
- How should you place the barcode on your book cover?
- How do you save the book cover with the barcode on it so that it isn't blurred?
- How can you convert the book cover image to a PDF without blurring the barcode?
Barcodes are special! The are meant to be scanned and just "looking good" to a person at a glance is often not good enough. It is especially important to prevent scaling of the barcode or saving in a compressed format. Hidden issues include "anti-aliasing" during the conversion of the encapsulated postscript to an image and the "jpeg" compression that will generally occur in PDF creation. These can damage your barcode and make it scan with errors when printed.
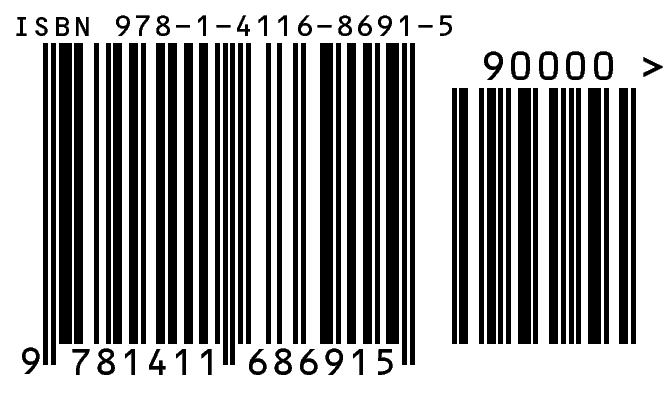
Elements of an ISBN barcode
The ISBN is the unique book number. Kind of like a master catalog number that allows people to order the book. Included in the number is a publisher's code that identifies the source of the book. For Published by Lulu books the publisher code identifies Lulu as the source.
The ISBNs have been 10-digit numbers until recently. That 10-digit number is actually a 9-digit ISBN number plus a "check digit" at the end that is calculated from the other numbers and allows scanning software to make sure that the number has scanned properly.
The EAN system of barcodes includes a "country code." However, all books are given the same, ficticious country code of 978. This fictional country is referred to as "Bookland." The ISBN barcoding is thus called the "EAN Bookland" barcode.
My first Lulu book has an ISBN of 1-4116-0953-0. The 0 at the end is the check digit. Recognizing that these 10-digit numbers are going to be running out, the International ISBN group has mandated a transition to 13-digit ISBNs. They did this long enough ago that in fact 13-digit ISBNs have actually been a part of book barcodes for years. For many years, the 13-digit ISBN has appeared at the bottom of the barcode.
The current set of 13 digit ISBNs are made by putting the 3 digits 978 at the beginning, following it with the 9 digits of the basic ISBN number, and then calculating a new check digit at the very end. In my book's case, this 13-digit ISBN is 978-1-4116-0953-2. Notice that the hyphenation is similar to that of the 10-digit version and the check digit is different. One point of this is that both the 10-digit and 13-digit ISBNs can be calculated from the 9-digit version.
13-digit Barcodes
The official changeover date to 13-digit barcodes is January 1, 2007.
The 13-digit ISBN version of the barcode differs from the 10-digit version only by having the hyphenated version of the 13-digit ISBN above the barcode instead of the 10-digit version. The bars and the number under the bars will remain the same.
Obtaining the barcode
There is a free "Bookland" barcode generator at: http://www.tux.org/~milgram/bookland The barcode that you get from this site is an encapsulated postscript file (.eps). It includes the bars and the text digits of the ISBNs. It does not have the required OCRB font embedded into the eps file. More on that shortly.
- Start by agreeing to the "no warranty" statement.
- Enter your ISBN.
- Also enter the generic 5-digit pricing code of "90000" which stands for no price given.
- Check the CMYK option and the "K" value as 1 with all others blank. (That defines the color as black.)
- Select the ">" character option.
- Give the name of your font. My OCRB font is actually named OCRBMT. I have another that is OCR B MT and that fails to work due to the spaces in the name.
- Scale factor 100%
- "Label scale" I set at 1.2--this scales the text over the bars.
- Bar width reduction 0.
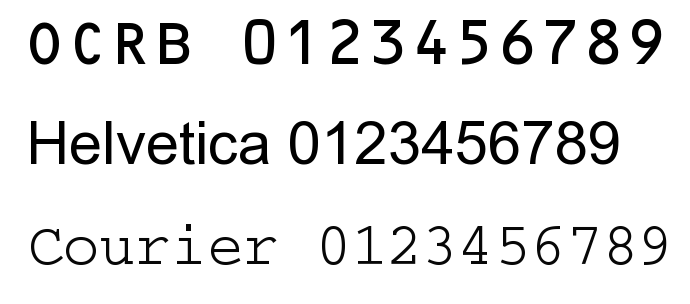
Font samples:
Another problem to solve, perhaps before generating your barcode, is to determine what font you will be using. Over the years as systems have switched from optical recognition of characters to the scanning of barcodes the font requirements have relaxed. Nevertheless it is still common to use an OCRB font for the human readable numbers on the barcode. I have found at least 6 versions of this font among various installation CDs I have used over the years. If you do not already have a version of the OCRB font, you can buy a copy, or you can choose to substitute a font. Several commercially produced books on my shelf use Courier for the barcode font. The barcode Lulu generated for the cover of my book was made using Courier and not OCRB. Whatever the font, you need to know how the program you will import the .eps file will call the font. On one of my systems it is actually named "OCRBMT". If I instead use OCRB in the generator, the font is not found.
Below is a high magnification view of fonts seen on some EAN barcodes. OCRB and Courier are fixed-pitch fonts. Helvetica may look more like OCRB than Courier does, but its variable pitch may not function properly for optical character recognition. This is not much of an issue in the days of almost universal bar scanning devices.
What do you do with an eps barcode?
When you generate the barcode, the result is an encapsulated postscript file downloaded to your system. One method for adding this file to your cover is to import it into the program that you use to create the image, put it on a white rectangular background if necessary (depends on the program that you import it to) and place it on the cover image in the right location. The final step will be converting the new version of your image in a PDF format. Each one of these steps has the potential to introduce artifacts and blurring that may render your barcode unreadable. Caution is advised.
Opening the barcode in a graphics program--setting the size
Upon opening the eps file into a graphics program it is "rasterized" or turned into a bit map. In so doing, you declare dimensions and/or the resolution of the image. Hence, in opening the .eps file you determine how large the barcode will be on your cover. You want to choose values that make the image the right size for your cover.
I am assuming that your cover is 300 pixels per inch or 300 dpi. At 300 dpi the barcode block produced by the Bookland barcode site is 1.3 inches by 2.3 inches. The current size used by Lulu is approximately 1 x 1.83 inches. The following discussion will illustrate how to get a barcode of approximately that size.
IMPORTANT: In all subsequent processing, we want to avoid resizing the barcode or subjecting it to image compression. The issue with resizing a bitmapped version of the barcode is that in the process of resizing, new pixel values are calculated and these almost invariably blur sharp edges. You do not want the edges of your bars blurred. Your final image uploaded to Lulu should be 300 dpi. The trick to sizing the barcode is to open it with a resolution that makes it the right size when placed on a 300 dpi cover.
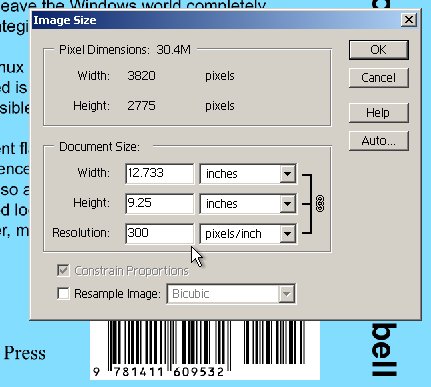
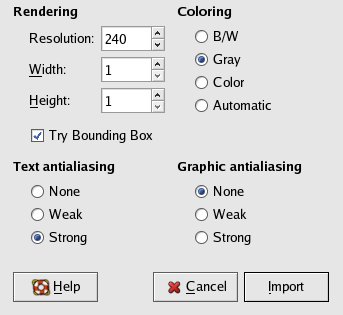
In Photoshop Elements or Photoshop you can set the image image size in inches while setting the resolution to 300 pixels/inch. In The GIMP v2.2, setting the dimension is not possible but you can set the resolution to 240 and you get a 1 x 1.8 inch barcode block when that barcode image is printed at 300 pixels/inch.
Another issue is "anti-aliasing" during conversion of the eps file to an image. Anti-aliasing is a way of "graying" intermediate pixels to fool the eye into thinking a slanted line or curve is smooth and not "jaggy." The bars should not be anti-aliased during conversion. Doing so in most programs grays the edges of the bars. Beware that some image programs may be able to import the eps file but might not allow you to define the resolution (dpi) or the aliasing.
The GIMP gives you the added option of selecting anti-aliasing separately for text and graphics. The GIMP also differs from Photoshop in importing the eps file with a white background. Photoshop opens the barcode as a black image on a transparent background. Therefore you might want to create a white rectangle on which to place the barcode image.
A note should be made that grayscale is used in the example because I wanted anti-aliasing of the fonts. However, care must be taken to ensure that the barcode is 100% black and not some dark shade of gray. Importing as black and white might in fact be better for some applications.
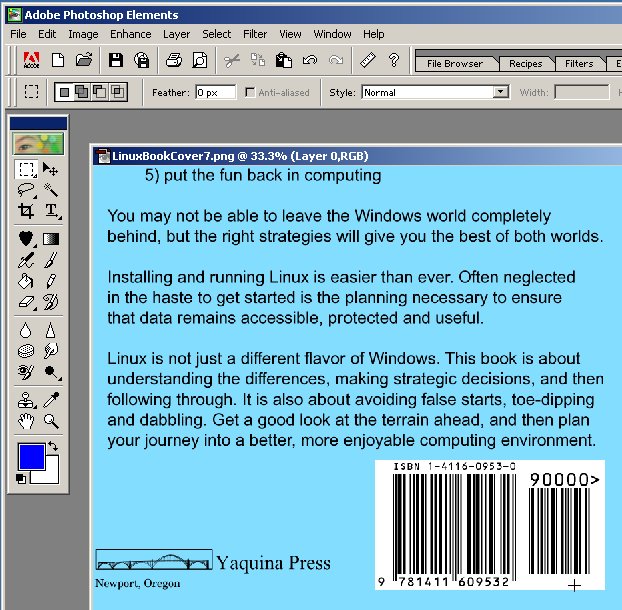
The cover image in the background has the white rectangle placed in the lower right corner of the back cover. The barcode is selected and copied from it's own window above the cover.
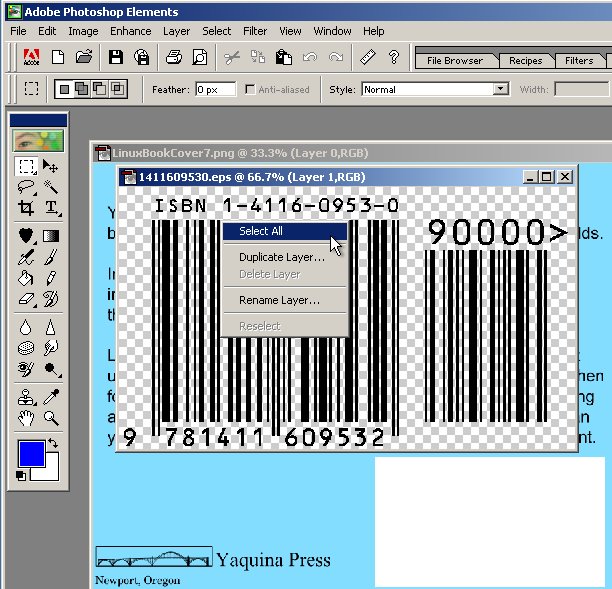
The rectangle can be selected and then the barcode "pasted into" that selection as seen in this screenshot:
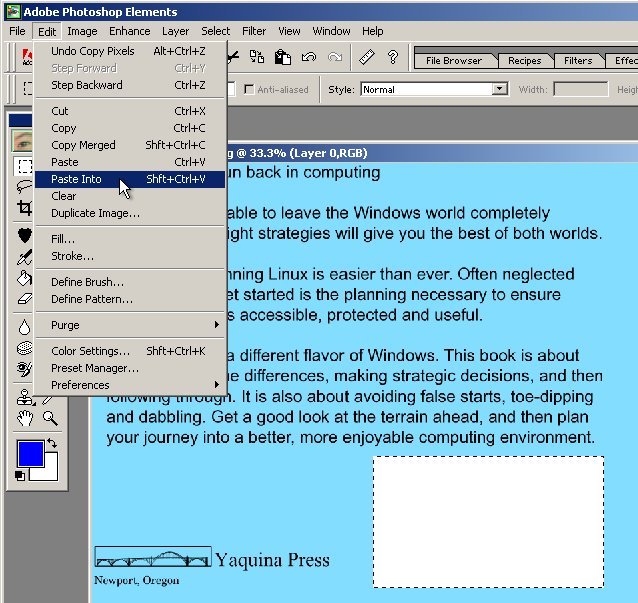
The result is the selected barcode image which is then anchored by clicking the mouse in the box:

When anchored in the box, the barcode image loses its selected status and appears sharp again:
Photoshop Elements seems to forget the resolution that has been set. It wants to default to a screen resolution and we need to set it back to 300 dpi for printing to our PDF. We do that without "resampling" because we want the same number of pixels but with a size in inches that matches our required cover:
With a custom page size set for our Adobe PDF/Distiller "printer driver" we can print our cover to postscript and convert to PDF as described in the PDF tutorial.
You should look at your PDF and examine your barcode in Adobe Reader.

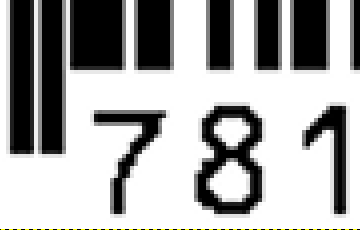
At low magnification all barcodes look pretty good. It is essential to look closely to see in detail whether there has been any "fuzzing" of the bars during any of your steps. I recommend looking in Adobe Reader or Acrobat at what it calls a magnifications of 800% or 1200%.
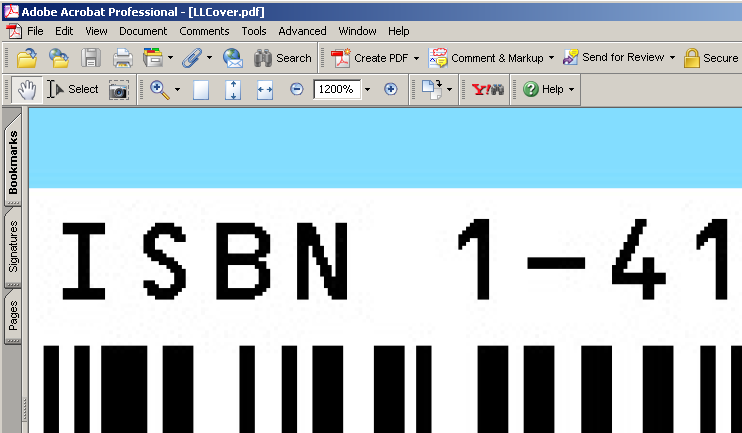
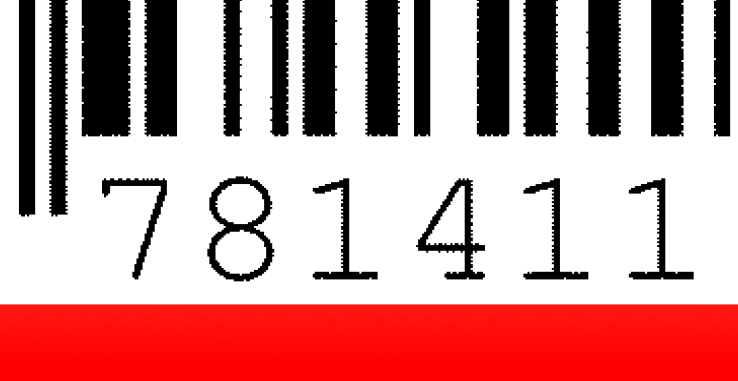
Notice the "jaggies" in the curves and slanted parts of the text. Those jagged steps are due to the lack of "anti-aliasing," a technique for using shades of gray on slants and curves to make the edges seem more smooth to the eye. At 300 dpi they will not be very noticeable. The appearance of the numbers and letters can be improved by anti-aliasing, but beware of anti-aliasing the whole image but cause the same process will blur the edges of the bars and make them less scannable.
Sources of barcode degradation include jpeg compression and scaling of the image. In my experiments, I found "jpeg artifact" to be more of an issue around the text than it is near the barcode itself. Nevertheless, it is worth avoiding. Greater artifacts come from resizing or scaling the barcode. Many setups for Acrobat automatically resize high resolution color images to 300 dpi.
Examples of barcodes:
Below is a similar screenshot of a closeup look at my first book's Lulu-generated and Lulu-placed barcode in the cover PDF generated before the era of one-piece covers. Interestingly the barcode itself is a bit ragged in ways I haven't found in my experiments. Also the font is not OCRB but Courier.
Placing the barcode
Covers are designed to be larger than the final book size and then are trimmed to that final size during production. That extra "bleed," beyond the edge of the book's contents, is 1/8 inch on the top, bottom and sides of a standard book. The barcode rectangle should be placed about 3/8 inches above the bottom of these covers so that it is about 1/4 inch above the bottom after trimming.
Your rectangular background with barcode on it should be positioned about 3/8 inch (.375 in) from the spine. The example below shows barcode rectangle placement for a regular perfect-bound book.
Another problem to solve, perhaps before generating your barcode, is to determine what font you will be using. Over the years as systems have switched from optical recognition of characters to the scanning of barcodes the font requirements have relaxed. Nevertheless it is still common to use an OCRB font for the human readable numbers on the barcode. I have found at least 6 versions of this font among various installation CDs I have used over the years. If you do not already have a version of the OCRB font, you can buy a copy, or you can choose to substitute a font. Several commercially produced books on my shelf use Courier for the barcode font. The barcode Lulu generated for the cover of my book was made using Courier and not OCRB. Whatever the font, you need to know how the program you will import the .eps file will call the font. On one of my systems it is actually named "OCRBMT". If I instead use OCRB in the generator, the font is not found.
Below is a high magnification view of fonts seen on some EAN barcodes. OCRB and Courier are fixed-pitch fonts. Helvetica may look more like OCRB than Courier does, but its variable pitch may not function properly for optical character recognition. This is not much of an issue in the days of almost universal bar scanning devices.
What do you do with an eps barcode?
When you generate the barcode, the result is an encapsulated postscript file downloaded to your system. One method for adding this file to your cover is to import it into the program that you use to create the image, put it on a white rectangular background if necessary (depends on the program that you import it to) and place it on the cover image in the right location. The final step will be converting the new version of your image in a PDF format. Each one of these steps has the potential to introduce artifacts and blurring that may render your barcode unreadable. Caution is advised.
Opening the barcode in a graphics program--setting the size
Upon opening the eps file into a graphics program it is "rasterized" or turned into a bit map. In so doing, you declare dimensions and/or the resolution of the image. Hence, in opening the .eps file you determine how large the barcode will be on your cover. You want to choose values that make the image the right size for your cover.
I am assuming that your cover is 300 pixels per inch or 300 dpi. At 300 dpi the barcode block produced by the Bookland barcode site is 1.3 inches by 2.3 inches. The current size used by Lulu is approximately 1 x 1.83 inches. The following discussion will illustrate how to get a barcode of approximately that size.
IMPORTANT: In all subsequent processing, we want to avoid resizing the barcode or subjecting it to image compression. The issue with resizing a bitmapped version of the barcode is that in the process of resizing, new pixel values are calculated and these almost invariably blur sharp edges. You do not want the edges of your bars blurred. Your final image uploaded to Lulu should be 300 dpi. The trick to sizing the barcode is to open it with a resolution that makes it the right size when placed on a 300 dpi cover.
In Photoshop Elements or Photoshop you can set the image image size in inches while setting the resolution to 300 pixels/inch. In The GIMP v2.2, setting the dimension is not possible but you can set the resolution to 240 and you get a 1 x 1.8 inch barcode block when that barcode image is printed at 300 pixels/inch.
Another issue is "anti-aliasing" during conversion of the eps file to an image. Anti-aliasing is a way of "graying" intermediate pixels to fool the eye into thinking a slanted line or curve is smooth and not "jaggy." The bars should not be anti-aliased during conversion. Doing so in most programs grays the edges of the bars. Beware that some image programs may be able to import the eps file but might not allow you to define the resolution (dpi) or the aliasing.

Importing eps into Photoshop
Elements
|
 Importing eps into The GIMP
|
The GIMP gives you the added option of selecting anti-aliasing separately for text and graphics. The GIMP also differs from Photoshop in importing the eps file with a white background. Photoshop opens the barcode as a black image on a transparent background. Therefore you might want to create a white rectangle on which to place the barcode image.
A note should be made that grayscale is used in the example because I wanted anti-aliasing of the fonts. However, care must be taken to ensure that the barcode is 100% black and not some dark shade of gray. Importing as black and white might in fact be better for some applications.
The cover image in the background has the white rectangle placed in the lower right corner of the back cover. The barcode is selected and copied from it's own window above the cover.
The rectangle can be selected and then the barcode "pasted into" that selection as seen in this screenshot:
The result is the selected barcode image which is then anchored by clicking the mouse in the box:
When anchored in the box, the barcode image loses its selected status and appears sharp again:
Photoshop Elements seems to forget the resolution that has been set. It wants to default to a screen resolution and we need to set it back to 300 dpi for printing to our PDF. We do that without "resampling" because we want the same number of pixels but with a size in inches that matches our required cover:
With a custom page size set for our Adobe PDF/Distiller "printer driver" we can print our cover to postscript and convert to PDF as described in the PDF tutorial.
You should look at your PDF and examine your barcode in Adobe Reader.
At low magnification all barcodes look pretty good. It is essential to look closely to see in detail whether there has been any "fuzzing" of the bars during any of your steps. I recommend looking in Adobe Reader or Acrobat at what it calls a magnifications of 800% or 1200%.
Notice the "jaggies" in the curves and slanted parts of the text. Those jagged steps are due to the lack of "anti-aliasing," a technique for using shades of gray on slants and curves to make the edges seem more smooth to the eye. At 300 dpi they will not be very noticeable. The appearance of the numbers and letters can be improved by anti-aliasing, but beware of anti-aliasing the whole image but cause the same process will blur the edges of the bars and make them less scannable.
Sources of barcode degradation include jpeg compression and scaling of the image. In my experiments, I found "jpeg artifact" to be more of an issue around the text than it is near the barcode itself. Nevertheless, it is worth avoiding. Greater artifacts come from resizing or scaling the barcode. Many setups for Acrobat automatically resize high resolution color images to 300 dpi.
Examples of barcodes:
 |
 |
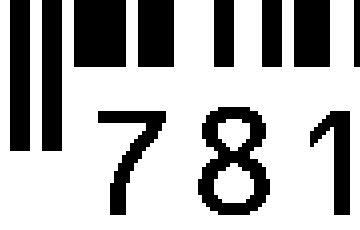
| Barcode created with no anti-aliasing and no
scaling after importing it and placing it on the cover. |
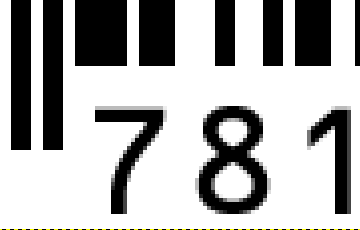
Barcode created in The GIMP with anti-aliasing of text but not graphics. No scaling. |
 |
 |
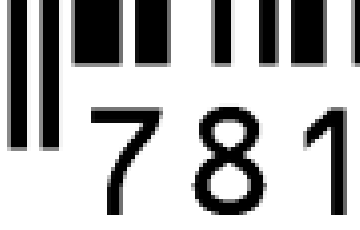
| Barcode created with no anti-aliasing at 600 dpi and then scaled in processing to 300 dpi. | Barcode created with no anti-aliasing at 200 dpi and then scaled to a final resolution of 300 dpi. |
Below is a similar screenshot of a closeup look at my first book's Lulu-generated and Lulu-placed barcode in the cover PDF generated before the era of one-piece covers. Interestingly the barcode itself is a bit ragged in ways I haven't found in my experiments. Also the font is not OCRB but Courier.
Placing the barcode
Covers are designed to be larger than the final book size and then are trimmed to that final size during production. That extra "bleed," beyond the edge of the book's contents, is 1/8 inch on the top, bottom and sides of a standard book. The barcode rectangle should be placed about 3/8 inches above the bottom of these covers so that it is about 1/4 inch above the bottom after trimming.
Your rectangular background with barcode on it should be positioned about 3/8 inch (.375 in) from the spine. The example below shows barcode rectangle placement for a regular perfect-bound book.
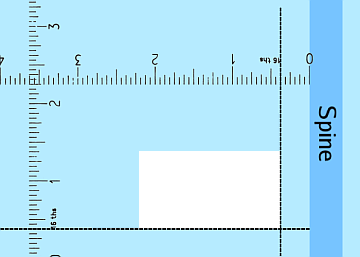 |
| Placement of barcode block on a regular book cover. |